How to Replace Bose QC35 I and II Left Side Metal Hinge Swivel
Did one side of your Bose QC 35's break off? If so, they likely broke at this swivel junction which is one of the more common issues with the QC 35's. In this guide, we show you how to replace the swivel.
If you would prefer to read a written repair guide, check that out below. Or if the tool cost seems prohibitive for a one time repair and you would prefer that we complete this repair for you, check out our Repair Catalog to see if we offer repair services for this device.
Are you a business? We offer wholesale discounts on our repair services if you are sending numerous units in for repair or want to send us continuing batches of devices for repair on a regular basis. Contact our support team for more info Info@JoesGE.com (This email is only for wholesale inquiries, please contact Support@JoesGE.com for other inquiries).
_____________________________________________
Repair Difficulty: Difficult (Extensive tooling and soldering required)
Time to complete: 60-90 Minutes
The tools and parts that you will need for this repair:
- Left Hinge Swivel (Choose your color) and the Left Hinge Arm (Not always broken, but most of the time it breaks with the swivel). **In some instances, your swivel is not actually broken, but rather the screw has come out of your swivel (Refer to the beginning of step 3). If this is the case, simply order the Screw in the color that you need.
- 2X T8 Screwdrivers (If you buy our Repair Kit there is a T8 bit included)
- A soldering iron (around 15 watts is good for small electronics and would be cheaper than purchasing a temperature variable unit although it would not work as well).
- Solder Flux (To ensure clean solder joints)
- Repair Kit (T8 Bit, Phillips, Flat head, and precision tweezers are all included)
- A Small Phillips Screwdriver
- A Small Flat Edge Screwdriver (Not required, but useful for removing old mesh and tape from inside of the ear cup)
- Some Precision Tweezers
- Double sided tape (For securing the R and L mesh back to the inside of the cup. The manufacturer tape is not usually reusable)
_____________________________________________
1. Remove the Ear Pad, Mesh, and Back Cover
Start by gripping the lower side of the ear pad with a few fingers on the outside and inside of it then pull it up and towards the center of the speaker. It will take some force but should just pop out. (You can also watch This Part of the Video to see how its done)

With the ear pad removed, you can now pull off the mesh from the inside of the speaker housing. Start from the left side and gently pull it up (The mesh is only held on by double sided tape and its normal for a small amount of the mesh to rip off and stay connected to the tape)


With the mesh removed, you will see two small Phillips head screws in the top and bottom of the speaker housing. Remove them 🔩 (Note: Be careful when removing the screws to not let them fall into the speaker grille)

Now you can pull the back cover off of the headphone cup. It can be tricky to remove so exercise some patience. It should come off after some wiggling as there are no other screws holding it in.


2. Remove the Main Wire And Ear Cup
Now its time to unsolder the main wire. There are a lot of small wires that need to be unsoldered and its easiest to take a photo of them before you start de-soldering them so that you can ensure that they are soldered back to the correct connection when you reassemble the headphones.
We recommend using a pair of tweezers to hold each wire and pull it away when you heat up the solder joint.
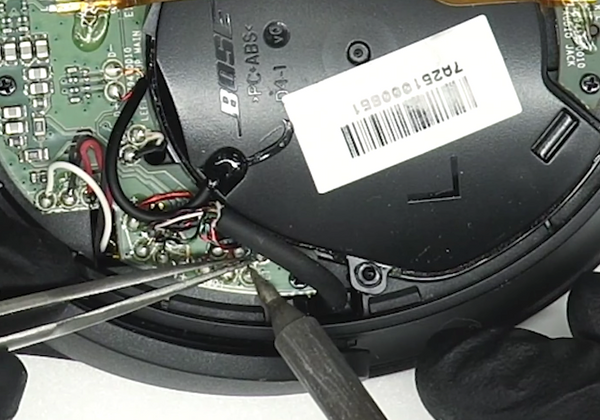
Next, use your screwdriver or pry tool to pop the hinge arm out of the speaker cup on the side opposite of the main wire, then repeat on the main wire side. (It might be helpful to watch this step in The Video)

Once you have loosened the ear cup from the hinge, pull the main wire entirely out of the ear cup so that you can set the ear cup to the side.

If you ordered a new Hinge Arm, go ahead and remove the two Phillips screws that hold both of the pieces together. If you did not order a new one and your current set is fine, just remove the two screws from the hinge arm.

Check the main wire to see if there are any loose pieces of the old swivel on it and remove them and set them away from your new parts.

3. Remove the Old Swivel
This is the part where having two T8 Screwdrivers comes in really handy. There are two screws that connect to each other to lock into place and hold the swivel into the headband. Using a screwdriver on either end, loosen the screw on the right until the small one comes out. The longer screw cannot turn since it is squared off so if you feel a lot of resistance turning one screw, try the other one. In the photo below, you would want to loosen the screw on the right.

Now use your thinnest screwdriver to push on the threaded end of the long screw until it comes out of its slot. This will take a good amount of effort.

With the swivel free, you can now slide it out of the headband. Be careful to not lose any of the washers that are installed in side of the swivel. There should be one on one side, and five on the other side.
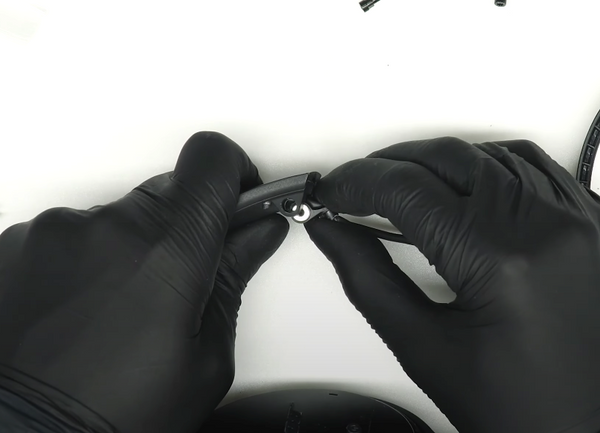
Slide the swivel off of the main wire. If you previously had glued or taped the swivel it might be harder to slide it off of the wire and we would recommend trying to carefully clean some of that glue off of the swivel with a Flat Edge Screwdriver so that the swivel can slide off of the wire easier.

4. Install the New Swivel
Twist the small wires at the end of the main wire with your fingers so that they can more easily be threaded through the new swivel.
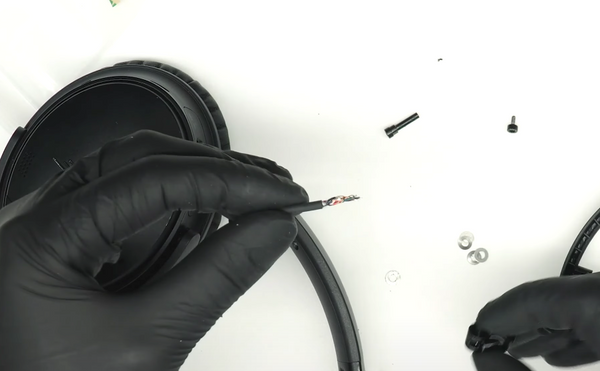
Slide the main wire through the new swivel.

Position the swivel close to the headband then articulate the length adjustment on the headband a few times to make sure that you did not pull too much wire out of it when removing the old swivel.

Reinstall the washers into the new swivel; Four of them on the deeper side of the swivel and one of them on the shallower side if you are using the original washers and screws.
Note: Use 3 washers on the deeper side of the swivel and one washer on the shallow side if you are installing screws and washers that you purchased from us.

Slide the swivel into the headband, making sure to not lose any of silver washers.

Reinstall the two screws that hold the swivel into place. You will see that on the longer screw, it is squared off just below the head of the screw, that square part needs to be seated in the side of the headband that is also squared off so that the screw cannot turn.

Having two screwdrivers to reinstall the screws is nice but not necessary. Just tighten the shorter screw until it is snug, then test the swivel to make sure that it moves somewhat freely.
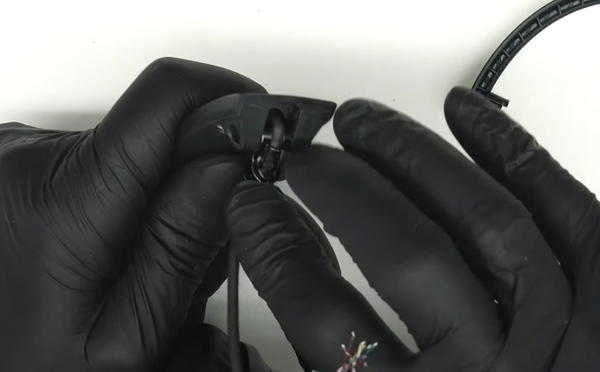
5. Reconnect the Ear Cup
Place the outside half of the hinge arm over the new swivel.

Push the wire into the hinge arm channel. Using a screwdriver to make sure that the wire is pressed in as far as it can go is a good practice.
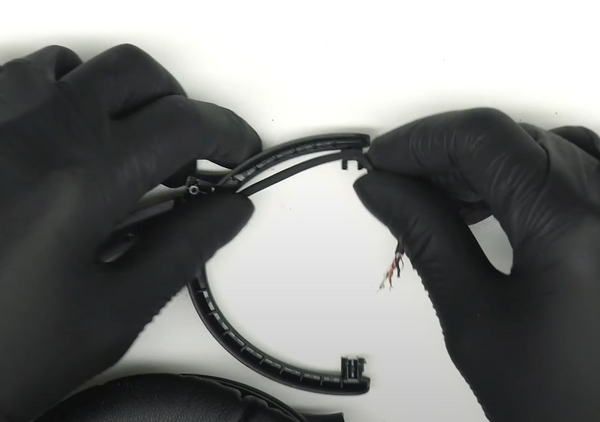


Install the other half of the hinge arm and install the two Phillips head screws so that the two halves are secured together. Once you have installed the screws, twist the hinge arm and fold it to make sure that it can rotate and fold smoothly.

Once again, twist the wires with your fingers so that they are as small as possible, then route the main wire through the hole in the ear cup and up over the circuit board. (It might be helpful to watch This Section of the Video)

Push both sides of the hinge arm into their corresponding hole in the speaker cup (Start with the side that the main wire goes through).

6. Re solder the Main Wire
You will need to solder each one of the small wires individually. If you took a photo before desoldering the wires, reference that as you solder them, otherwise, feel free to reference the ones that we use below :)


Before you put the headphones back together, check to make sure that they work. Turn the power on and make sure that you hear the power up prompt and see the green and white lights turn on. If you'd like, go ahead and connect them to your phone and play some music to make sure they function.

7. Re install the Back Cover, Ear Pad, and Mesh.
Start by placing the rubber microphone gasket back onto the microphone (If yours also fell off during the repair haha)

Place the back cover onto the speaker cup then install the two Phillips head screws to secure it into place


If you have new double sided tape, you can remove the old tape. We do this by peeling up the edge with a flat head screw driver then peeling it off. If your tape is still tacky enough to hold the mesh, theres no need to replace it.

Once you've installed new tape or determined the OEM tape to be tacky enough, install the speaker cover mesh making sure that the "L" would be positioned right side up with the headphones unfolded.

Lastly, snap the ear pad into place. Put one side of it into the speaker cup and press on it until you hear a click then go all the way around the ear pad pressing until you hear the click. (It might be helpful to watch This Part in the Video)

