
Sony XM5 Headphone [WH-1000XM5] - How to Replace a Damaged Headband
If your Sony XM5 headphones have a broken or damaged headband, this repair will restore their functionality and comfort. Common signs that indicate the need for this repair include a cracked or loose headband, or difficulty adjusting the headphones. Replacing the headband assembly can save you the cost of a new pair and extend the life of your headphones.
This repair involves delicate disassembly, handling small screws and ribbons, and ensuring proper reconnection of multiple internal components, which requires patience and some technical skill.
Parts you'll need 🧰
- A replacement Headband (Pick the right color for your Sony WH-1000XM5 Headphones from the drop-down Below)
If the tool cost seems prohibitive, check out our repair catalog to see if we offer repair services for your device. If it's not listed, we don't repair it.
_____________________________________________
Steps to Repair your Sony WH-1000XM5 Headphones
If the repair process is daunting, check out our repair catalog to see if we offer repair services for your device. If it's not listed, we don't repair it.
Step 1: Remove the Earpads
1.1 Use the pry tool at the top of the right earpad and gently pry it up. Repeat this at the bottom and sides until the earpad comes off.

1.2 Once the earpad is off, remove the cushion underneath.

1.3 Repeat the same process for the left earpad.

Step 2: Remove Screws and Covers
2.1 Start with the right side: remove the screws using the Philips screwdriver.

2.2 After the right side is complete, remove the screws from the left side.

2.3 Flip the headphones over and remove the touchpad from the right side and the cover pad from the left side by gently unplugging them. Set them aside.


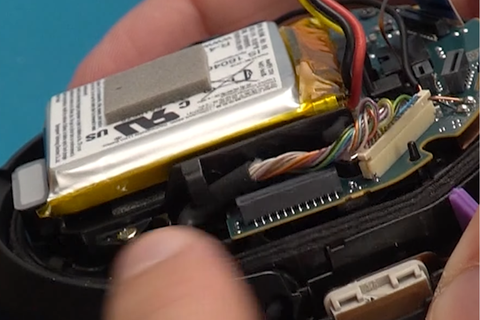
Step 3: Disconnect Internal Components
3.1 Unplug the battery using the flathead screwdriver to carefully pry it out.

3.2 Disconnect the main internal wire from the power board using your fingernail and the flathead screwdriver to ease it up.

3.3 Unplug the charger port ribbon and the MS port ribbon from the power board.

Step 4: Remove the Power Board
4.1 Remove the two black screws holding the power board in place.

4.2 Move the power board aside carefully.

4.3 Remove the two hidden screws underneath the power board.

Step 5: Detach the Swivel Assembly
5.1 Use the flathead screwdriver to carefully lift the right swivel mesh halfway.

5.2 Free the clips underneath the mesh and remove the swivel assembly.

5.3 Repeat the same process on the left side. Note: You don’t need to unplug any ribbons on the left side.


Step 6: Install the New Headband Assembly
6.1 Take the new headband assembly and begin by assembling the left side first. Place the assembly into position.


6.2 Fasten the two screws to secure the assembly. Tuck the wire under the mesh and press the mesh down.


6.3 Plug the main internal wire into the Bluetooth board and secure it under the clip.


6.4 Attach the left ear cup by screwing it back into place. Ensure it is tightly secured.


Step 7: Reassemble the Right Side
7.1 Repeat the same steps on the right side, making sure to pull the power board through the mesh before fastening it down.

7.2 Reattach the power board with the two screws, making sure all wires are tucked in properly.

7.3 Connect the main internal wire and secure it under the clip. Then reconnect all the ribbons to the power board.

7.4 Plug in the battery last, ensuring it is fully connected.

Step 8: Final Assembly
8.1 Reconnect the touchpad and left-side cover pad, ensuring they are aligned and secure.

8.2 Fasten all remaining screws on both sides.

8.3 Reattach the right earpad by pressing it down firmly on the top, bottom, and sides until you hear it click into place.

Congratulations!
You’ve successfully replaced the headband assembly on your Sony WH-1000XM5 headphones!
